Pizza Pot Pies: The Ultimate Comfort Food Mash-Up Recipe
Introduction
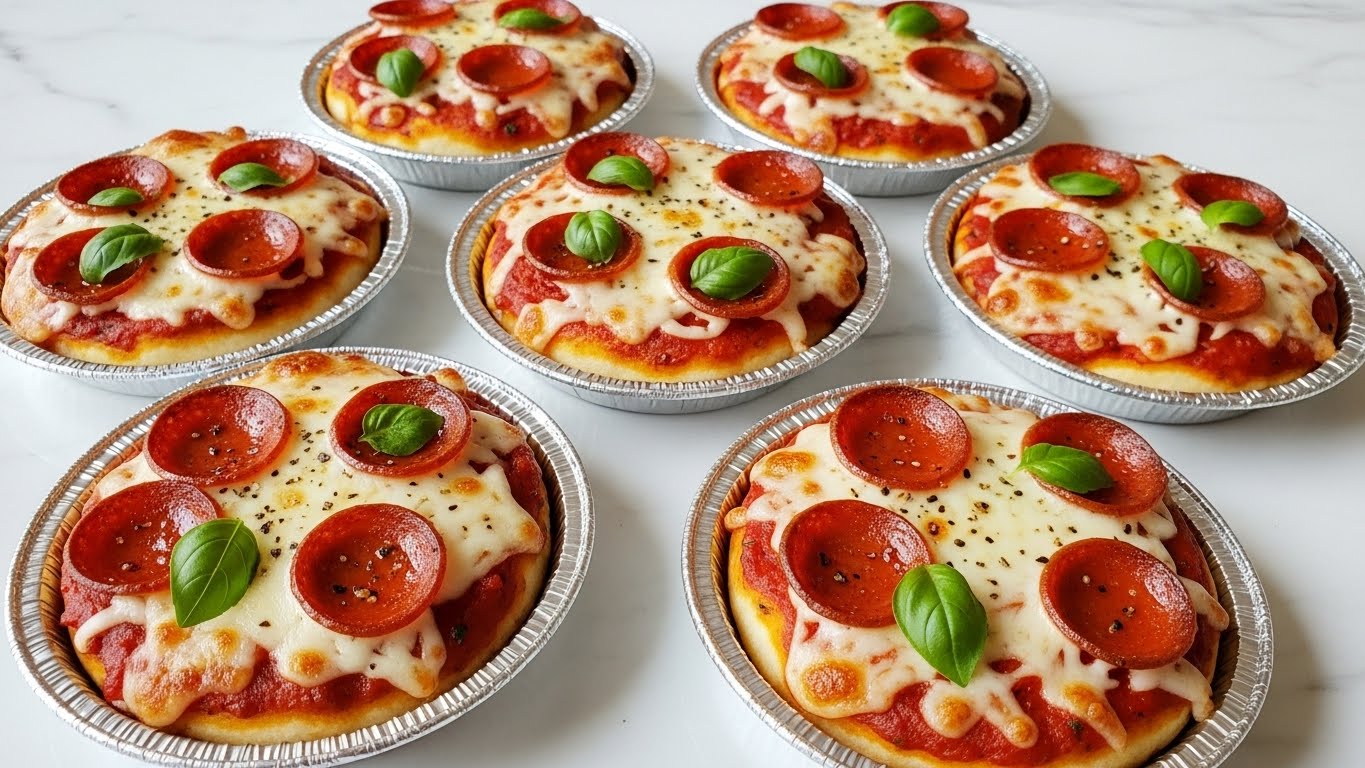
Pizza pot pies combine the best of two beloved comfort foods: pizza and pot pies. These individual-sized savory treats feature a crispy crust filled with gooey cheese, tangy sauce, and your favorite toppings. Perfect for a cozy dinner or entertaining guests.

Ingredients
- 1 package refrigerated pizza dough (or homemade pizza dough)
- 1 1/2 cups marinara sauce or pizza sauce
- 1 1/2 cups shredded mozzarella cheese
- 1/2 cup pepperoni slices (or your choice of toppings such as sausage, mushrooms, bell peppers, olives)
- 1/4 cup grated Parmesan cheese
- 1 teaspoon dried oregano
- 1 teaspoon dried basil
- 1/2 teaspoon garlic powder
- 1/4 teaspoon red pepper flakes (optional)
- Olive oil for brushing (optional)
Instructions
- Step 1: Preheat your oven to 375°F (190°C).
- Step 2: Lightly grease 4-6 small ramekins or oven-safe bowls, depending on the size of your pies.
- Step 3: Roll out the pizza dough on a lightly floured surface to about 1/8 inch thickness.
- Step 4: Cut the dough into circles or squares large enough to fit into your ramekins, leaving about 1 inch of dough hanging over the sides.
- Step 5: Gently press the dough into the bottom and sides of each ramekin to form a crust.
- Step 6: Spoon about 2 tablespoons of pizza sauce into the bottom of each crust.
- Step 7: Sprinkle 2-3 tablespoons of shredded mozzarella cheese over the sauce.
- Step 8: Add a few slices of pepperoni or your preferred toppings.
- Step 9: Sprinkle a little grated Parmesan, dried oregano, basil, garlic powder, and red pepper flakes over the filling.
- Step 10: Top each pot pie with more mozzarella cheese and fold the overhanging dough over the top to partially cover the filling.
- Step 11: Brush the tops with a little olive oil for a golden finish, if desired.
- Step 12: Place the ramekins on a baking sheet and bake in the preheated oven for 20-25 minutes, or until the dough is golden and the cheese is melted and bubbly.
- Step 13: Allow the pies to cool for 5 minutes before serving.
- Step 14: Serve hot with extra marinara sauce on the side for dipping.
Tips & Variations
- Use your favorite pizza toppings or a mix of vegetables to customize each pot pie.
- For a crispier crust, pre-bake the dough-lined ramekins for 5 minutes before adding the fillings.
- Try adding a sprinkle of crushed red pepper or Italian seasoning to boost flavor.
- Brush the dough edges with egg wash instead of olive oil for a shiny, golden finish.
Storage
Store leftover pizza pot pies in an airtight container in the refrigerator for up to 3 days. To reheat, bake in a 350°F (175°C) oven for about 10 minutes or microwave until heated through, though baking helps keep the crust crisper.
How to Serve
Serve this delicious recipe with your favorite sides.
FAQs
Can I use homemade pizza dough for this recipe?
Absolutely. Homemade pizza dough works great and adds a personal touch to your pizza pot pies.
Can I prepare these pot pies ahead of time?
Yes, you can assemble the pot pies in advance and refrigerate them uncovered for a few hours before baking. Just add a few extra minutes to the baking time if baking straight from the fridge.
PrintPizza Pot Pies: The Ultimate Comfort Food Mash-Up Recipe

Pizza Pot Pies combine the comforting flavors of classic pizza with the cozy, handheld appeal of pot pies. Using refrigerated or homemade pizza dough, this recipe layers marinara sauce, mozzarella, pepperoni, and Italian herbs inside ramekins, then bakes them until golden and bubbly. Perfect as a fun family meal or snack, these pot pies offer a delicious twist on traditional pizza in an individual serving size.
- Prep Time: 15 minutes
- Cook Time: 20-25 minutes
- Total Time: 35-40 minutes
- Yield: 4–6 individual pot pies 1x
- Category: Main Dish
- Method: Baking
- Cuisine: Italian-American
- Diet: Halal
Ingredients
Pizza Dough
- 1 package refrigerated pizza dough (or homemade pizza dough)
Filling
- 1 1/2 cups marinara sauce or pizza sauce
- 1 1/2 cups shredded mozzarella cheese
- 1/2 cup pepperoni slices (or your choice of toppings such as sausage, mushrooms, bell peppers, olives)
- 1/4 cup grated Parmesan cheese
Seasonings & Other
- 1 teaspoon dried oregano
- 1 teaspoon dried basil
- 1/2 teaspoon garlic powder
- 1/4 teaspoon red pepper flakes (optional)
- Olive oil for brushing (optional)
Instructions
- Preheat Oven: Preheat your oven to 375°F (190°C) to ensure it’s ready for baking the pot pies.
- Prepare Ramekins: Lightly grease 4-6 small ramekins or oven-safe bowls based on their size to prevent sticking.
- Roll the Dough: On a lightly floured surface, roll out the pizza dough until it’s about 1/8 inch thick to get a thin yet workable crust.
- Cut Dough Shapes: Cut the dough into circles or squares big enough to fit into the ramekins, leaving about 1 inch of dough hanging over the edges for sealing.
- Form Crusts: Gently press the dough pieces into the bottoms and sides of each ramekin, shaping a crust to hold the fillings.
- Add Sauce: Spoon approximately 2 tablespoons of pizza sauce into the bottom of each dough-lined ramekin.
- Add Cheese: Sprinkle 2-3 tablespoons of shredded mozzarella cheese over the pizza sauce layer for gooey, melty texture.
- Layer Toppings: Add a few slices of pepperoni or your preferred toppings like sausage or vegetables.
- Season Fillings: Sprinkle grated Parmesan, dried oregano, basil, garlic powder, and optional red pepper flakes evenly over the toppings for robust flavor.
- Top with Cheese & Seal: Add more mozzarella cheese on top, then fold the dough that hangs over the sides partially over the filling to create a rustic top crust.
- Brush with Olive Oil: Optional step—brush the dough tops with olive oil to help achieve a golden, crispy finish during baking.
- Bake: Place the ramekins on a baking sheet and bake in the preheated oven for 20-25 minutes, until the crust is golden brown and the cheese is melted and bubbly.
- Cool Slightly: Let the pot pies cool for about 5 minutes to set the filling and avoid burns when serving.
- Serve: Serve hot, optionally with extra marinara sauce on the side for dipping.
Notes
- You can customize toppings according to your preferences—try sausage, mushrooms, bell peppers, or olives.
- Use homemade pizza dough for a fresher taste, or store-bought dough for convenience.
- Brushing olive oil on the crust before baking helps achieve a golden, crispy texture but can be omitted for a lighter crust.
- Ensure to let the pot pies cool slightly before serving to avoid burns and help set the filling.
Keywords: Pizza Pot Pie, individual pot pies, pizza dough recipe, comfort food, easy dinner, baked pizza, mozzarella cheese, pepperoni pizza, Italian comfort food