Melt-in-Your-Mouth Cake Recipe
Introduction
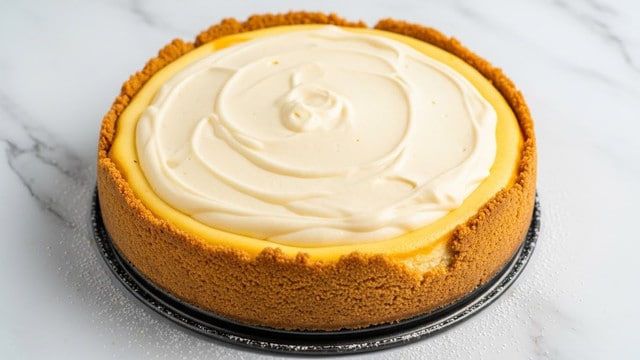
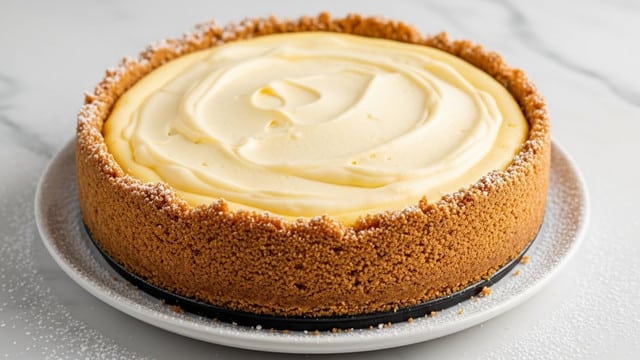
This Melt-in-Your-Mouth Cake is a delicate, creamy dessert that’s surprisingly simple to make. Featuring soft cake layers filled with a rich, smooth cream, it’s perfect for any occasion when you want to impress with minimal effort.
Ingredients
- 150 grams (1 ½ cups) all-purpose flour
- 100 ml (½ cup) water
- 100 ml (½ cup) milk
- 80 grams (⅓ cup) butter
- 4 large eggs
- 1 teaspoon baking powder
- ½ teaspoon salt
- 500 ml (2 cups) milk
- 150 grams (¾ cup) sugar
- 100 grams (1 cup) all-purpose flour
- 2 large eggs
- 180 grams (¾ cup) butter
- Icing sugar or your favorite garnish
Instructions
- Step 1: In a saucepan over medium heat, melt 80 grams of butter. Add 100 ml each of milk and water along with ½ teaspoon of salt. Stir until the butter is fully melted and the liquids combine.
- Step 2: In a separate bowl, whisk together 150 grams of flour and 1 teaspoon of baking powder for even distribution.
- Step 3: When the liquid mixture boils, reduce heat and gradually add the dry flour mixture while stirring constantly. Cook the dough until it pulls away from the pan sides and forms a smooth ball.
- Step 4: Transfer dough to a mixing bowl to cool until warm but not hot. Add 4 eggs one at a time, mixing well after each addition until smooth and slightly sticky.
- Step 5: Preheat oven to 400°F (200°C). Line a 25cm round baking pan with parchment paper. Divide dough into two equal parts. Spread one portion evenly and bake for 20 minutes on the middle rack. Repeat with second portion. Let layers cool completely.
- Step 6: For the cream filling, beat 2 eggs and 150 grams sugar in a bowl until pale and frothy. Gradually add 100 grams flour and then 500 ml milk, whisking to a smooth batter.
- Step 7: Cook cream mixture over medium heat, stirring constantly until thickened and boiling. Let it cook for 3 minutes, then remove from heat and cover with plastic wrap to cool.
- Step 8: Beat 180 grams butter in a separate bowl until light and fluffy. Add the cooled cream mixture gradually, blending well after each addition to make a smooth filling.
- Step 9: Assemble the cake by placing one cake layer in a pan, spreading half the cream filling over it, topping with the second layer, and spreading the remaining cream on top.
- Step 10: Refrigerate the cake for at least two hours to set the cream and allow flavors to meld.
- Step 11: Garnish with icing sugar or your favorite decoration before serving.
Tips & Variations
- For extra flavor, add a teaspoon of vanilla extract to the cream filling.
- You can substitute some of the all-purpose flour with almond flour for a nutty twist.
- Ensure the dough is warm and not hot before adding eggs to avoid scrambling.
- Chill the cake longer if you prefer a firmer cream texture.
Storage
Store the finished cake covered in the refrigerator for up to 3 days. To serve, allow it to sit at room temperature for 15–20 minutes for softness. Avoid freezing, as the cream filling may separate upon thawing.
How to Serve
Serve this delicious recipe with your favorite sides.
FAQs
Can I make this cake ahead of time?
Yes, it’s best to prepare the cake a few hours in advance to allow the cream to set fully. Refrigerate and serve within 3 days for optimal freshness.
Can I use a different type of milk?
Whole milk works best for the cream’s richness, but you can use reduced-fat or plant-based milk. Keep in mind that this may slightly affect texture and flavor.
PrintMelt-in-Your-Mouth Cake Recipe

This Melt-in-Your-Mouth Cake features a soft, tender dough layered with a rich, creamy filling. The cake layers are baked until golden and topped with a luscious homemade cream made from eggs, sugar, flour, milk, and butter. The cake is chilled to set the cream and garnished with icing sugar or your favorite decoration, making it an irresistible treat perfect for any occasion.
- Prep Time: 20 minutes
- Cook Time: 40 minutes
- Total Time: 3 hours (including chilling time)
- Yield: 8 servings 1x
- Category: Dessert
- Method: Baking
- Cuisine: International
Ingredients
Dough Ingredients
- 150 grams (1 ½ cups) all-purpose flour
- 100 ml (½ cup) water
- 100 ml (½ cup) milk
- 80 grams (⅓ cup) butter
- 4 large eggs
- 1 teaspoon baking powder
- ½ teaspoon salt
Cream Filling Ingredients
- 500 ml (2 cups) milk
- 150 grams (¾ cup) sugar
- 100 grams (1 cup) all-purpose flour
- 2 large eggs
- 180 grams (¾ cup) butter
- Icing sugar or your favorite garnish
Instructions
- Preparing the Dough: Melt the butter over medium heat in a saucepan. Add the water, milk, and salt, stirring until the butter is fully melted and the liquids are combined.
- Mix the Dry Ingredients: In a separate bowl, whisk together the flour and baking powder to ensure an even distribution.
- Cook the Dough: Bring the liquid mixture to a boil, then reduce heat. Gradually add the dry flour mixture while stirring continuously to prevent lumps. Cook until the dough pulls away from the pan sides and forms a smooth ball.
- Cool and Add Eggs: Transfer dough to a bowl and let it cool until warm, not hot. Add eggs one at a time, mixing thoroughly after each addition until the dough is smooth and slightly sticky.
- Bake the Layers: Preheat the oven to 400°F (200°C). Line a 25cm round baking pan with parchment paper. Divide dough into two equal parts and bake each for 20 minutes on the middle oven rack until golden and set. Let layers cool completely.
- Whisk the Base Ingredients for Cream: In a bowl, beat eggs and sugar until pale and frothy. Gradually add flour, then milk, whisking continuously to form a smooth batter.
- Cook the Cream: Pour the batter into a saucepan and cook over medium heat, stirring constantly until thickened and starting to boil. Continue cooking for 3 minutes, then remove from heat and cover with plastic wrap to cool.
- Blend Butter and Cream: Beat butter in a separate bowl until light and fluffy. Gradually add the cooled cream mixture a few spoonfuls at a time, blending well to achieve a smooth, creamy filling.
- Assemble the Cake: Place one cake layer in a baking pan and spread half the cream filling evenly on top. Add the second layer and cover with the remaining cream.
- Chill and Garnish: Refrigerate the cake for at least two hours to allow the cream to set and flavors to meld. Before serving, garnish with icing sugar or your preferred decoration.
Notes
- Allow the dough to cool to warm before adding eggs to prevent scrambling them.
- Stir dough continuously while cooking to avoid lumps and ensure smooth texture.
- Cover the cream mixture with plastic wrap directly touching its surface to prevent a skin from forming while cooling.
- Ensure cake layers are completely cooled before assembling to prevent melting the cream filling.
- Refrigerate the assembled cake well to help the cream set firm for easier slicing.
- Use parchment paper to avoid sticking and for easy removal of cake layers.
Keywords: Melt-in-Your-Mouth Cake, creamy cake, baked cake layers, homemade cream filling, easy dessert